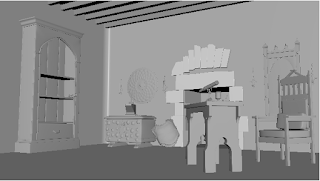
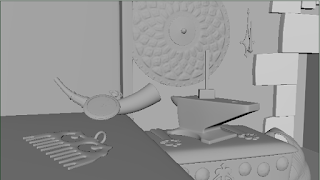
After 4 weeks of work, I have completed my medieval scene for model creation class. In this scene, there is a total of 16 unique props that I modeled this month. For all of these models, we focused on edge flow and making models look good in the 3-key smoothing mode. As we moved through the class, an increasing amount of emphasis was put on detail in order to create life-like models. During the last week, we worked with z-brush and I learned a lot about this program that was foreign to me. I added tertiary detail to 3 models using z-brush, which are the shield, chest armor, and goblet. I am especially proud of these because even though they might not be as clean as I hoped, I was able to accomplish a lot on a program that I've never used before. For these models, I also had to focus on UV mapping. UV mapping wasn't extremely challenging but was vital to adding texture to my props. Overall I am proud of what I was able to accomplish with this scene.
Saturday, December 19, 2015
Thursday, November 19, 2015
The Final Week of 3DF
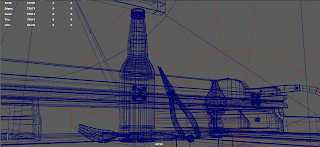
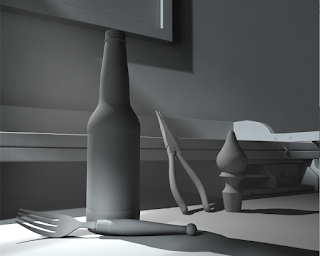
This was my final week of 3DF and the work I am most proud of is my final still life. I imported my four best models (the beer bottle, fork, pliers, and bottle-stopper) and placed them on the desk to create a still life. The hardest part of this project was arranging the objects and angling the camera in a manner that would create a visually interesting piece. In order do accomplish this, I first sketched out what I wanted the composition to look like. Through trial and error, I then moved the objects around on the desk until I found a layout that worked best. During the rendering process, I tried shooting multiple angles of the still life until I found one that I liked the most and used the principles of design effectively. This project took me about 2 hours to complete, excluding the modeling time for the objects. In the end, I am extremely proud of this still life and think it represents all of the hard work I have put into this class the past four weeks. Check out some pictures below.
Still Life in wire frame
Still life shaded
Final Render of Still Life
Saturday, November 14, 2015
Week 3: Modeling and Rebuilding
In this week of 3DF class, we delved into more techniques of modeling and began to create more detailed models. We also rebuilt numerous assets to see our improvement, and I am most proud of my fork asset rebuild this week. In my first model, I had a lot of trouble trying to figure out how to accurately construct the fork. In the end, I made a good model but I knew it could be a lot better. Therefore, I decided to rebuild the fork and see if I could improve upon my original model.
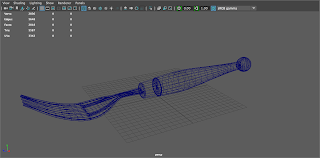
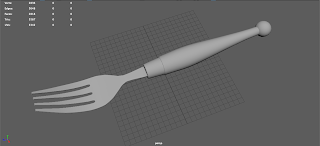
I decided to approach the fork differently this time around. I first built the handle the same way I built it originally and also beveled the edges to make it look more realistic. For the fork itself, I started with a cube and used the extrude tool to create the basic shape of half of the fork, excluding the negative space in-between the fork tips. Using the insert edge loop tool, I then added in lines for the shape of the fork tips. Next, I deleted the excess faces around the fork tips and used the append to polygon and multi-cut tools to fill in the holes in the fork tips. After completing this half of the fork, I then mirrored the object and merged the copy with the original in order to get a complete fork. Finally, I beveled the edges and cleaned up the entire object. In the end, my rebuild was a success and I was able to overcome the obstacles I faced with the fork. This model took be about 3 hours to build. Here are some photos of the original model and the rebuild.
Original Fork Asset Model
Wireframe of Fork Asset Rebuild.
Shaded Fork Asset Rebuild.
Thursday, November 5, 2015
Week 2: Modeling
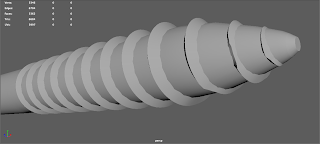
I have completed my second week of 3D Foundations and I am now already halfway through the course. This week we moved from blocking out objects to actually modeling them. I am most proud of the eye-screw model because it was challenging. The biggest problem I faced was making the grooves. I had a lot of trouble making the grooves form to the shape of the screw itself, especially at the tip. After spending a lot of time manipulating the vertices and faces of the helix, along with testing out the soft selection tool for the first time, I was finally able to make the helix the fit the eye-screw.
In regards to the rest of the eye-screw, I started off with a cylinder and used the extrude tool to form the object's shape accurately. This model took me about 3 hours to complete and I am very proud of what I accomplished. Check out some pictures below:
In regards to the rest of the eye-screw, I started off with a cylinder and used the extrude tool to form the object's shape accurately. This model took me about 3 hours to complete and I am very proud of what I accomplished. Check out some pictures below:
The shaded final product of the eye-screw.
The wireframe of the eye-screw.
The grooves on the tip of the eye-screw model.
Saturday, October 31, 2015
First Week of 3DF
I just completed my first week of my 3D Foundations class and I am quickly becoming comfortable with the Maya interface. I completed activities that tested my ability to use basic tools in the program and even began to block-out objects that I will be modeling later in the course.
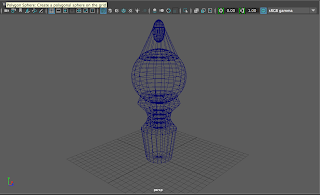
The project I am most proud of this week is my bottle stopper block-out. This object had a lot of curves which made it particularly challenging. For the top of the stopper I started with a sphere and figured out which shapes recreated the tip through trial and error. The middle of the stopper was the hardest to figure out because of its unique curvature. In order to solve this problem, I created multiple cylinders and manipulated the vertices to create the desired shape. This project took about 2 hours to complete and I am very proud of what I was able to accomplish. Pictures of the model are featured below.
The project I am most proud of this week is my bottle stopper block-out. This object had a lot of curves which made it particularly challenging. For the top of the stopper I started with a sphere and figured out which shapes recreated the tip through trial and error. The middle of the stopper was the hardest to figure out because of its unique curvature. In order to solve this problem, I created multiple cylinders and manipulated the vertices to create the desired shape. This project took about 2 hours to complete and I am very proud of what I was able to accomplish. Pictures of the model are featured below.
Wireframe of the bottle stopper.
Bottle stopper shaded.
The different perspectives of the bottle stopper.
Subscribe to:
Posts (Atom)

